Capturing Aurora Borealis at the Best Spots in Europe for Viewing the Northern Lights: Must-Have Camera Gear and Lens Recommendations
Venturing into the ethereal world of aurora borealis photography represents one of the most thrilling pursuits for any photographer drawn to the mysteries of the natural world. Capturing those luminous curtains of green, purple, and pink dancing across the northern skies demands not only patience and timing but also a carefully chosen arsenal of camera equipment and technical know-how. With Europe offering some of the most accessible and visually stunning locations for witnessing the Northern Lights, understanding the right gear and settings transforms a fleeting celestial moment into a breathtaking image that tells a story of cosmic wonder.
Prime European Locations for Photographing the Aurora Borealis
Selecting the ideal location can make all the difference when it comes to aurora borealis photography. Europe boasts a remarkable array of destinations where the Northern Lights grace the skies with regularity, each offering its own unique blend of accessibility, natural beauty, and photographic opportunity. From the rugged coastlines of Scandinavia to the vast wilderness of the Arctic Circle, these prime spots provide the perfect stage for capturing nature's most spectacular light show.
Norway's tromsø and fjord regions: accessibility meets natural brilliance
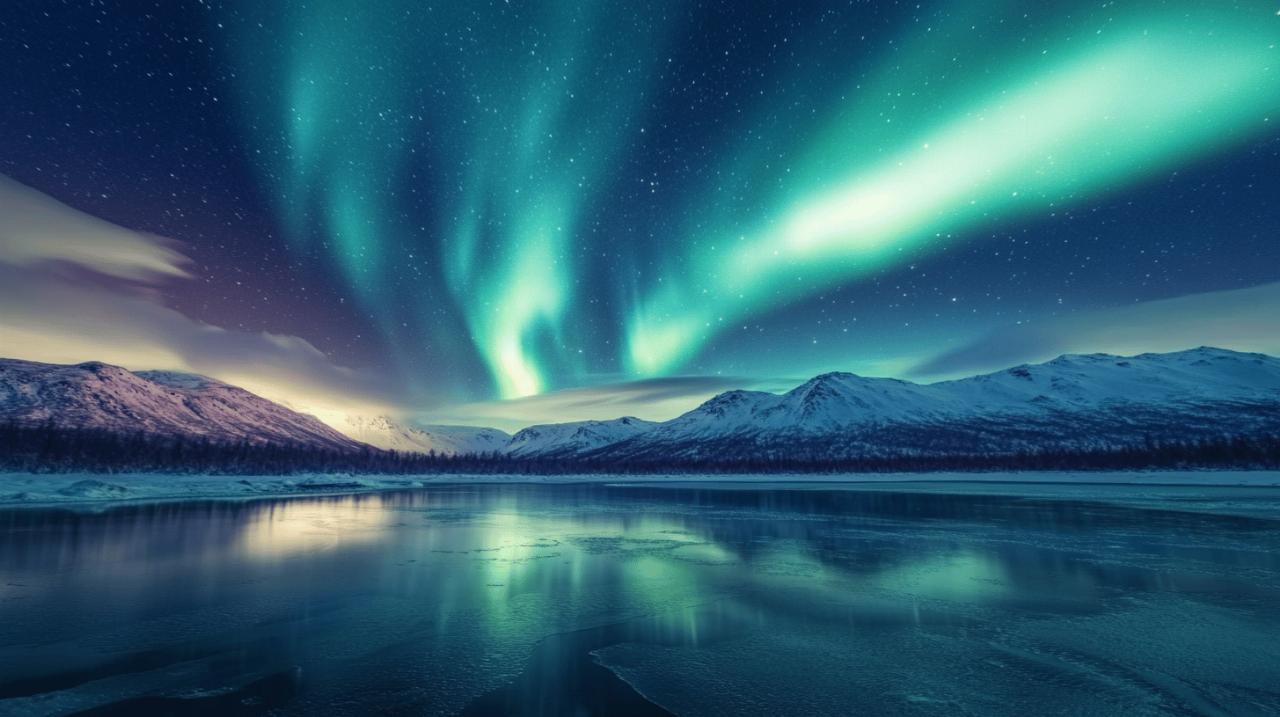
Norway stands out as one of the most celebrated destinations for witnessing and photographing the aurora, and for good reason. Tromsø, often referred to as the gateway to the Arctic, combines excellent infrastructure with a strong likelihood of clear skies and vivid auroral displays. The city itself lies well above the Arctic Circle, positioning it squarely within the aurora zone. What makes Tromsø particularly attractive is its accessibility; flights connect directly from major European cities, and a wealth of organised tours cater to both seasoned photographers and first-time aurora chasers. The surrounding fjord regions offer dramatic foreground elements such as snow-capped mountains, frozen lakes, and traditional Norwegian fishing villages, all of which add depth and context to your compositions. During the polar night period, which spans several weeks in northern Norway, the sun never rises above the horizon, creating extended windows of darkness that significantly increase your chances of witnessing the lights. Hurtigruten ships, which traverse the Norwegian coast, even feature a northern lights alarm to alert passengers when the aurora appears, ensuring no opportunity is missed. The combination of reliable weather patterns, minimal light pollution outside urban centres, and stunning natural landscapes makes Norway an essential destination for anyone serious about capturing the aurora borealis.
Iceland, Lapland, and Beyond: Diverse Landscapes for Aurora Photography
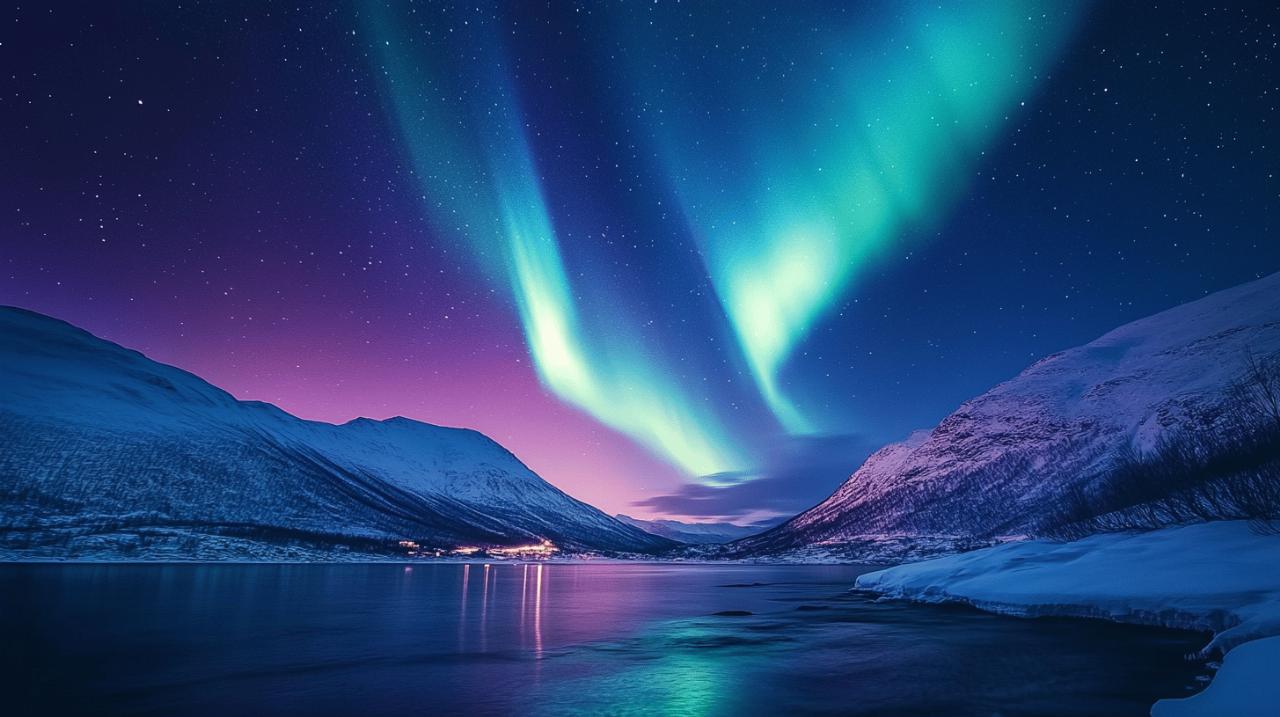
Iceland presents a compelling alternative, offering not only frequent auroral activity but also a diverse range of landscapes that can elevate your photography to new heights. The island nation's rugged terrain, punctuated by glaciers, volcanic formations, geysers, and black sand beaches, provides an ever-changing canvas for aurora compositions. Jökulsárlón Glacier Lagoon and Thingvellir National Park rank among the most photogenic locations, where the interplay between ice, water, and aurora creates truly mesmerising imagery. The period between September and April marks the prime viewing season, with the 2025-2026 timeframe anticipated to be particularly spectacular due to peak solar activity. Iceland's compact size allows photographers to embark on self-drive tours, granting the freedom to chase clear skies and respond dynamically to changing weather conditions. Meanwhile, Lapland, encompassing parts of Finland and Sweden, offers its own distinct charm. The region's festive atmosphere, particularly around Rovaniemi, blends seamlessly with opportunities for aurora photography amidst snow-laden forests and frozen rivers. Whether you're drawn to the dramatic contrasts of Iceland or the serene wilderness of Lapland, each destination provides unique photographic possibilities that reward those willing to brave the cold and venture into the darkness.
Essential camera bodies for northern lights photography
Choosing the right camera body forms the foundation of successful aurora borealis photography. While modern smartphones have made strides in low-light performance, nothing quite matches the capability of a dedicated camera when it comes to capturing the subtle gradations of colour and detail inherent in the Northern Lights. The ability to control exposure settings manually, shoot in RAW format, and pair your camera with high-quality lenses makes all the difference in producing professional-grade images.
Full-frame vs crop sensor cameras: low-light performance considerations
The debate between full-frame and crop sensor cameras centres primarily on low-light performance, a critical factor when photographing the aurora. Full-frame sensors, with their larger physical dimensions, capture more light and generally produce cleaner images at higher ISO settings. This advantage becomes particularly apparent when shooting in the dark conditions typical of aurora photography, where ISO values around 1600 or higher are often necessary. The improved noise handling and greater dynamic range of full-frame cameras allow for more flexibility in post-processing, enabling you to recover shadow detail and fine-tune colours without introducing excessive grain. However, crop sensor cameras, while not quite matching the low-light prowess of their full-frame counterparts, have improved dramatically in recent years and remain a viable option, especially for photographers working within tighter budgets. Mirrorless cameras, whether full-frame or crop sensor, often outperform traditional DSLRs in terms of weight, electronic viewfinders that provide real-time exposure feedback, and advanced autofocus systems that can be useful for composition even if manual focus is used for the final shot. The key is to prioritise models known for strong high ISO performance, as this capability directly impacts your ability to capture the aurora with minimal noise and maximum detail.
Recommended Camera Models and Key Features for Aurora Capture
When selecting a camera for aurora borealis photography, several models stand out across different budget ranges. For those investing under five hundred pounds for both camera and lens, exploring the used gear market can yield excellent results. Older full-frame DSLRs or more recent crop sensor mirrorless models offer solid foundations for aurora work. As budgets increase to around one thousand pounds, full-frame mirrorless cameras become accessible, offering enhanced low-light performance and a broader range of native lenses. Cameras at this price point typically feature robust manual controls, the ability to shoot in RAW format, and reliable weather sealing, all of which prove invaluable in the harsh Arctic conditions. For those willing to invest up to two thousand pounds, the latest generation of full-frame mirrorless cameras deliver exceptional sensor technology, improved battery life, and advanced features such as in-body image stabilisation, although the latter is less critical when using a tripod. Regardless of budget, prioritise cameras with good battery performance, as cold weather rapidly depletes charge. Carrying spare batteries is essential, and keeping them warm in an inside pocket until needed helps maximise their lifespan during long shooting sessions.
Lens selection for optimal aurora borealis imagery
 Selecting the appropriate lens is arguably even more critical than the camera body when it comes to aurora borealis photography. The lens determines not only your field of view but also how much light reaches the sensor, directly influencing your ability to capture the aurora's ethereal glow. Understanding the interplay between focal length and aperture allows photographers to make informed decisions that enhance their results.
Wide-angle fast aperture lenses: the foundation of night sky photography
Wide-angle lenses form the backbone of aurora photography, enabling you to capture expansive swathes of sky alongside compelling foreground elements that provide scale and context. A focal length between 14 millimetres and 35 millimetres strikes the ideal balance, allowing you to encompass both the aurora and the surrounding landscape without excessive distortion. The importance of a large aperture cannot be overstated; lenses with an aperture of f/2.8 or lower gather significantly more light, permitting shorter shutter speeds and lower ISO settings. This capability proves crucial when the aurora is faint or rapidly shifting, as faster shutter speeds help freeze the motion and preserve detail. A wide aperture also facilitates manual focusing, as the brighter viewfinder image makes it easier to achieve critical focus on distant stars or landscape elements. When evaluating wide-angle lenses, consider not only the maximum aperture but also optical quality, as elements such as coma, chromatic aberration, and vignetting can degrade image quality, particularly at the edges of the frame where stars and aurora details are often present. Investing in a high-quality wide-angle lens pays dividends across all genres of night sky photography, making it a versatile addition to any photographer's kit.
Focal Length and Aperture Recommendations: From f/2.8 to f/1.4
While an aperture of f/2.8 represents the minimum standard for aurora photography, lenses with even larger apertures such as f/1.8 or f/1.4 offer additional advantages. These ultra-fast lenses excel in extremely low-light conditions, enabling you to use lower ISO values and thereby reduce noise, or alternatively, to employ faster shutter speeds that capture finer detail in rapidly moving auroral displays. Primes lenses, with their fixed focal lengths, often deliver superior optical performance and larger maximum apertures compared to zoom lenses at similar price points. A 24-millimetre f/1.4 prime, for instance, provides exceptional light-gathering capability and sharpness, making it a favourite among aurora photographers. However, the trade-off is reduced flexibility in composition; you must physically move to adjust framing rather than simply zooming in or out. For photographers who value versatility, a high-quality zoom lens such as a 14-24mm f/2.8 offers a practical compromise, enabling a range of compositions without the need to swap lenses in challenging conditions. Ultimately, the choice between prime and zoom depends on your shooting style and priorities, but ensuring a maximum aperture of at least f/2.8 remains non-negotiable for consistently capturing the aurora in all its glory.
Supporting Kit and Technical Settings for Aurora Photography
Beyond the camera and lens, a range of supporting accessories and a solid understanding of technical settings are essential for successful aurora borealis photography. These elements work in concert to ensure stability, precision, and creative control, transforming a challenging shoot into a rewarding experience.
Tripods, Remote Releases, and Essential Accessories for Stability
A sturdy tripod ranks among the most critical pieces of equipment for aurora photography. Given the long exposure times often required, even the slightest camera movement results in blurred images. Opt for a robust tripod capable of withstanding wind, a common feature of Arctic locations, and ensure the legs can be spread wide for additional stability on uneven terrain. Carbon fibre models, while more expensive, offer the advantage of reduced weight without sacrificing strength, an important consideration when trekking to remote locations. A remote release or intervalometer further minimises the risk of camera shake by allowing you to trigger the shutter without physically touching the camera. Many modern mirrorless cameras also offer smartphone connectivity, enabling remote control via a dedicated app, which can be particularly useful for fine-tuning settings without exposing your hands to the cold. Additional accessories worth considering include lens hoods to reduce stray light and condensation, microfibre cloths for clearing snow or moisture from the lens, and a headlamp with a red light mode to preserve night vision while adjusting settings. Dressing warmly cannot be overstated; thermal layers, insulated gloves that allow for dexterity, and a windproof outer shell ensure you remain comfortable during extended shooting sessions, enabling you to focus on capturing the aurora rather than enduring the cold.
Camera settings breakdown: iso, shutter speed, and manual focus techniques
Mastering manual camera settings unlocks the full potential of your equipment when photographing the aurora. Begin by switching to manual mode, which grants complete control over exposure parameters. Set your lens to its widest aperture, typically f/2.8 or lower, to maximise light intake. An ISO setting of around 1600 serves as a reliable starting point, striking a balance between sensitivity and noise, although this may need adjustment based on the intensity of the aurora and ambient light conditions. Shutter speed requires careful consideration; a duration of approximately five seconds often proves effective, though brighter displays may require shorter exposures to prevent overexposure, while fainter auroras might necessitate longer times. Experiment with settings and review your results on the camera's LCD screen, paying attention to the histogram to ensure highlights are not clipped and shadows retain adequate detail. Manual focus is essential, as autofocus systems struggle in low-light conditions. Switch your lens to manual focus and set it to infinity, or use live view to zoom in on a bright star and adjust focus until it appears as a sharp pinpoint. Alternatively, focus on a distant landscape element illuminated by moonlight or artificial light. Shooting in RAW format rather than JPEG preserves maximum image data, providing greater latitude for adjustments to exposure, white balance, and colour during post-processing. Setting white balance manually to around 3500 to 4000 Kelvin, or selecting the fluorescent preset, helps render the aurora's colours more accurately, though this can also be fine-tuned later if shooting in RAW. Finally, disable image stabilisation if your lens or camera body features it, as this can sometimes introduce unwanted artefacts during long exposures on a tripod.